Last evening I installed Ubuntu Gutsy Gibbon (7.10) on my Dell Laptop which was pre-installed with Windows XP and it worked like a charm.
Though this is not the first time that I am installing Ubuntu for a dual boot environment however every time I tend to get a bit jittery on what would work and what would not.
Any way these are the steps that I followed which worked for me.
Step 1 ) Download Ubuntu 7.10 and burn the iso file to a cd. Now boot your system with this Live CD and play with Ubuntu for a while to see that all is working fine. You might want to look at a few things such as your wireless connection is working fine, the graphics card, sound card, mic etc are working. Once you have played enough it is time to get the real suff done.
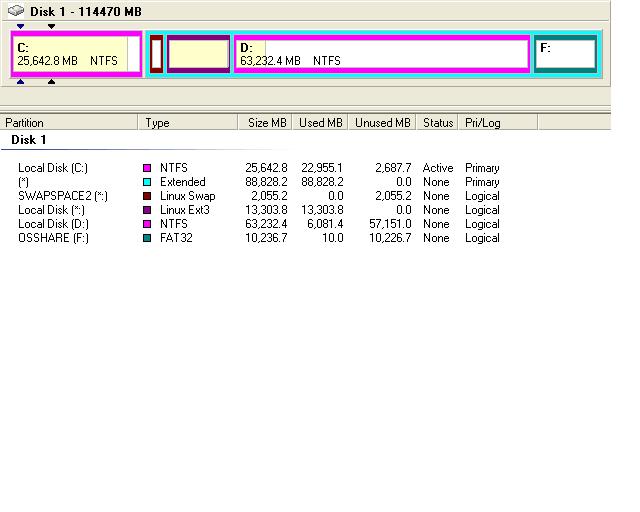
Step 2) De-fragment the drives on your machine. I had 2 drives C (40GB) D (80 GB).
Step 3) Using a partitioning utility such as Partition Magic resize the windows partition so that Linux can be installed and create a few more partitions as mentioned.
a) I resized my windows partition on C drive from 40 GB to 25 GB. This gave me 15 GB of unallocated space.
b) Create a partition of 2GB ( ideally double the size of your RAm but 2GB was the max that partition magic allowed me to go) and change the type of this format to linux swap
c) Rest of the space allocate to type ext3. This is linux specific format.
NOTE :- I created all of these as logic partitions
d) I resized my d drive from 80GB to 70 GB and created a partition of 10 Gb of the type FAT32. The benefit of this is that both windows and Linux can read and write to this partition. Though Ubuntu can write to NTFS too the FAT32 gives you a better shaing plafom.
Step 4) Once you have decided on the partitions and resizing, ask Partition magic to do its magic. It would restart the machine and do all the steps.
Step 5) Once everything is done, login to XP to see that nothing is screwed up 🙂
Step 6) Boot the system again from Live CD and hit on the install option
Step 7) After setting the easy stuff of time zone and language etc on on the installation step 4 of 7 you would be asked about the partitioning strategy. Select MANUAL as the strategy. Once you hit next, the installer would list all the partitions already existing. You would be able to see all the partitions that you created using Partition Magic. Select the one with ext3 filetype as the boot partition and one you click on the ext3 row there would be 3 buttons which come at the bottom. Select EDIT PARTITION and change point the ext3 partition to root i.e. /
Step 8 ) Click next, Ubuntu would warn you that the changes cannot be undone. Ask it to proceed.
Step 9) The installer would now start and let you know once it is done and would ask you to remove the live CD.Somewhere in between the installer would tell you (if you are not connected to internet) that it could not verify the sources and that you should download the patches later. Follow Step 11 for that.
Step 10) Once the restart is complete you should see the Ubuntu OS installed as the first OS to be used. In the other OS section you should also see the Windows XP OS. If you want to boot to XP then you should use the arrow keys to scroll down to the xp os.
Step 11) Login into Ubuntu. Open a terminal window. Goto /etc/apt/. Now, on the terminal prompt type sudo gedit sources.list. In this file uncomment all the entries which have a line above them which says that the repository was skipped because it could not be verified (or something similar to this)
You are done, enjoy your new OS.


Posted on Monday, April 7, 2008
0